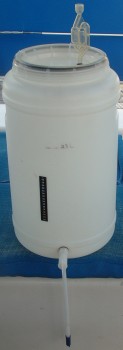
Our carboy fermenter
Brewing Procedure
 Our carboy fermenter |
There are lots of websites devoted to brewing beer, and I wish that we had better internet access so I could check them out. This is just my procedure, for brewing on Ocelot, using the equipment and resources that I have at hand. These steps are not meant to be authoritative. If anyone has any corrections, comments, or questions, please don't hesitate to contact me.
As I'm still new at this, these steps are bound to change as I learn this interesting art. It breaks down into 4 main steps, explained below:
| Preparation for fermentation | |
| Starting fermentation | |
| Preparation for bottling | |
| Bottling |
I've also added sections on determining the alcoholic content of beer, some notes on the various brewing sugars available, and the possible reasons for some common faults.
Take the following to a place where there's lots of fresh water:
|
|
| Take everything out of the carboy (which usually doubles as a carry-all here) and mix up a liter or 2 of hot water and brewers detergent in the bottom of the carboy. | |
| Scrub the entire inside of the carboy, paying special attention to the spigot threads. Also scrub the spigot, water-trap, carboy top, thermometer, and both spoons. | |
| Rinse everything thoroughly to remove all trace of the detergent. | |
| Mix up a bit of the SM in cold water in the bottom of the
carboy. Put the spigot, water-trap, thermometer, and both spoons in the mix to soak. Note: Asthmatics should not use Sodium Metabisulfite. |
|
| Wash the entire inside of the carboy with the SM, as well as the spigot, water-trap, carboy top, thermometer, and both spoons. Let them soak for 30 minutes or so to ensure that everything is as sterile as possible. | |
| Rinse everything thoroughly in fresh cold water. Dry on clean surface and put away cleaning supplies. | |
| Screw the spigot into the carboy and make sure it's seated firmly and turned off. |
Starting the fermentation:
This step can start immediately after everything is clean and sterile.
Tap water in the tropics is usually pretty close to the correct temperature
for brewing, 70°-80°F (21°-27°C). Most brewing instructions say to mix
the sugar and malt-mix in hot water, and then add cold water to come up to
23 liters and the correct temperature. However, I got in trouble on my
first brew when I tried to follow those instructions, as
the tap water wasn't cold enough to cool the wort down to the ideal temperature
for brewing. I had to implement emergency procedures like adding ice-cubes
and refrigerated water. For future attempts, I'm just going to use cold
(cool) tap water, as the sugar and malt-mix should dissolve easily in that.
I may also try a test-run by filling the carboy with water (minus the
ingredients) to get a feel for what is needed to achieve 70°-80°F (21°-27°C)
with the water I have available.
| Open the malt-mix and pour it into the bottom of the carboy. Use warm water and/or the spoon to get as much as possible into the carboy. Add water to bring the total up to about 4 liters (1 gallon). | |
| Add 1kg of brewers sugar (see below) to the mix in the carboy. Stir the mix to dissolve all the sugar. | |
| Add water to the wort to bring it up to about 20 liters while checking the temperature. Fermentation works best between 70°-80°F (21°-27°C) but it's also supposed to work (although not as well) over a temperature range of 64°-90°F (18°-32°C). Add more water to bring the wort up to 23 liters at the correct temperature. | |
| Stir the wort a bit to ensure uniformity and to get some air into it. This initial fermentation stage starts out as aerobic, and then changes to anaerobic once the oxygen is all used up. | |
| Measure and record the initial specific gravity of the wort if you want to keep close tabs on the alcoholic content. | |
| At this point, the wort is vulnerable and prompt addition of the yeast is more important than getting the temperature perfect. Sprinkle the yeast on top of the wort (do not stir it in) and close the lid firmly. | |
| Put a bit of water in the water trap and install the trap in the hole in the lid of the carboy. Fermentation bubbling of CO2 through the trap should start within 12 hours. | |
| Place the carboy in a protected environment where the temperature can be monitored for several days. | |
| When fermentation bubbles slow down to ~1/min and/or the specific gravity drops to below 1.010 and stabilizes for a couple of days, the beer can be bottled. However, leaving the mix in the carboy for a few extra days doesn't seem to hurt the beer. |
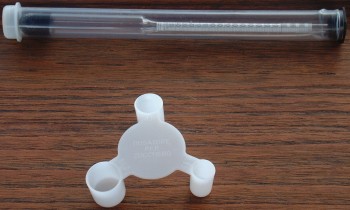
 Top: Brewing hydrometer (case doubles as sample holder) Bottom: Dosing spoon, with cups for 3 common sizes of beer bottles - 33cl, 50cl, & 75cl (12, 18, & 27 fl. oz) |
Preparation for bottling:
We don't like the weight or the potential for breakage of glass on board if we
can help it. Yes, glass is less porous and can be cleaned better, but the
bottles also are hard to re-seal. Therefore we decided to use plastic
pop-bottles instead. This is a bit of an experiment and we're not sure how
many times we can use them, but plastic bottles are everywhere, they're lighter
and easier to collect and store, and probably more rugged as well. As a
bonus, the bottles come with screw-tops which are easily reusable and resealable.
Initially, we decided to
standardize on 1.25 liter bottles (the equivalent of almost 4 standard stubbies)
which are a common size here in Australia.
Also, we tried cleaning our bottles with Brewers Detergent, but the bottles were very clean already and the detergent foamed so much when we shook the bottles that rinsing them would have taken forever, so we generally skipped this step unless a bottle showed visible dirt after rinsing.
Take the following to a place where there's lots of fresh
hot water:
|
|
| Rinse all bottles thoroughly with hot water. | |
| Mix up a batch of SM in one of the bottles. | |
| Shake the bottle to coat the inside and let it sit for a few minutes while you rinse the previous bottle. | |
| Pour the SM into the next bottle with the funnel. | |
| Rinse out the bottle thoroughly, cap, and put back in carton. | |
| Repeat the above for all bottles (this will take a while...). | |
| Also clean the bottom-fill tube, especially the valve at the bottom, and the measuring spoon. |
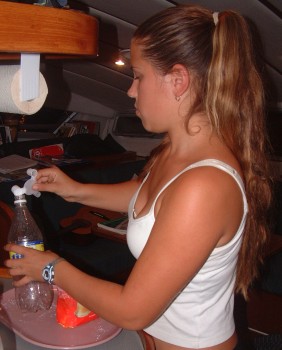
 Amanda dosing bottles with sugar for priming, just before bottling |
Bottling:
We generally do our bottling on Ocelot, as we don't like moving the
carboy full of beer any more than we have to. The dead yeast has settled to the
bottom, and we don't want to disturb it. That's why the spigot on the
carboy is close to, but not at, the bottom of the carboy. You actually
don't want to bottle the last liter or 2.
| Measure and record the specific gravity of the beer. | |
| Put the carboy gently in a raised position (our cockpit table). | |
| Insert the bottom fill tube into the spigot and open the valve. | |
| Remove the water trap from the top of the carboy. | |
| Put 8 grams/liter of dextrose into each bottle. | |
| Fill each bottle as high as possible and cap the bottle. | |
| Shake each bottle gently to dissolve all of the sugar. | |
| Store the bottles in a cool, dark place (our bilges). | |
| Clean up carboy, spigot, fill tube, and sugar residue. |
Do not use maltodextrin or other non-fermentable sugars for priming or the beer won't have enough carbonation. Beer should stand for at least 2 weeks after bottling before drinking, but should improve with age (finer bubbles and a creamier head). Beer should be at its peak about 2 months after bottling. In the tropics, you should be able to feel the bottles pressurize within an hour or so.
Determining alcohol content:
The alcohol content of beer is usually determined by specific gravity readings.
Readings need to be taken just before the yeast is added (Original Gravity, or
OG) and just before bottling (Final Gravity, or FG). For the
purposes of the formula below, remove the decimal point from all specific
gravity readings (so 1.040 becomes 1040). The formula for determining
alcoholic content then becomes:
((OG - FG) / 7.46) + 0.5 = % alcohol by volume
Note that the 0.5% is added to reflect the fermentation of the priming sugar in the bottle.
Notes on Brewing Sugars:
(This area is still being researched)
The sugars used in brewing beer are not usually standard table sugar.
Instead, brewing sugars usually consist of Sucrose, Dextrose, Light Malt, and/or
Maltodextrin, often in various mixes. Having said that, Coopers, a well
respected brewer, does sell glucose drops for priming (not that we use them).
Also, a good friend who has also been brewing for years does use
standard table sugar, and he certainly produces a delicious brew.
According to my brew-master brother:
"Sucrose is cane sugar. Dextrose is corn sugar. Sucrose has the potential to give your beer "off flavors", and if used in excess of about 30% of your fermentable sugars, it and/or dextrose can give beer a "cidery" taste. Sucrose has a "hotter" taste when fermented, but it produces a higher gravity (alcohol) than the same amount of dextrose.
Both sucrose or more commonly dextrose, can be added (as "adjuncts") to the "gloop" or malt extract syrup to boost alcohol and "lighten" the body of the beer. The maltodextrin is a "complex carbohydrate" midway between a sugar and a starch which can be added to increase body and "mouthfeel". Not much of it ferments and there shouldn't be much more than 8oz. per 5 gallons. If you want your beer to have a lighter body, you could go with just the dextrose. I'm not positive of the Australian terminology, but I believe "light malt" is simply powdered (light) malt extract and could be substituted for the dextrose (or sucrose) in your recipe if you wanted your beer to be all (barley) malt. Dextrose is recommended for priming (carbonating) though.
Personally, I'm a fan of all-malt brews, and so generally don't use adjunct sugars. This comes from "Rhinheitzgebot", the German Beer Purity Law dating back to the 15th century which requires German beers to be made without adjuncts - just malt, water, yeast and hops. Therefore I would tend to use, for instance, 2 cans or bags of malt extract rather than 1 and some adjunct. I believe if you used the light malt in conjunction with your "gloop" you would be brewing all-malt without doubling the amount of hop flavors that are already in the kit. Having said that, I did add a pound of dextrose to my last 10 gallon batch simply to jack up the alcohol a bit. When bottling I used to add dextrose to prime, but now I just "force carbonate" by pressurizing my chilled keg to about 15 psi and shaking it until I can no longer hear the CO2 flowing from the tank into the keg.
It is generally more convenient and consistent to batch-prime rather than bottle prime. I used to batch-prime by siphoning my beer out of my (glass carboy) fermenter(s) and back into my stainless brew-pot, leaving the sediment in the fermenter so it didn't get stirred up. But if you are using only one vessel to mix and ferment, it does make more sense to bottle-prime."
Brewing Pages:
Jon's Pages:
Top Level: Home | Destinations | Cruising Info | Underwater | Boat Guests | Ocelot | Sue | Jon | Amanda | Chris | Site Map | Make a Comment
|
If our information is useful, you can help by making a donation |
Copyright © 2000‑ Contact: Jon and Sue Hacking -- HackingFamily.com, svOcelot.com. All rights reserved.