Cruising Australia
This information is also available under our
Australian Destinations and our
Australian Newsletters
sections.
Cruising the Australian East and North Coasts
As we've mentioned elsewhere, Brisbane is both a good port of entry and a
delightful place to sit out cyclone season. This page documents where we
stopped as we cruised from Brisbane to Darwin. It is by no means comprehensive - for
that you must get Alan Lucas' cruising guides (and please don't use copied
versions - Alan's a cruiser just like us; we met him and his wife and son during
their circumnavigation in the 80s). For Southern and Western Australia and Tasmania, check out
Jack and Jude's excellent website
as they chronicle their voyages in their 37' cutter Banyandah. Of course,
Noonsite also has
excellent coverage of Australia.
Cruisers: We are now publishing
Downloadable Track Files in OpenCPN (.gpx) format and in MaxSea (.ptf) format (not all tracks are available in all formats yet - we're
still working on it and they take time). You can download the track files either by clicking on
the links in the tables below, or by clicking on the track in the Google Map below the table. The
MaxSea files are in native format but the OpenCPN files are zipped so they download faster, and they need
unzipping after they've been downloaded (which most operating systems do natively). If 2 files are shown, the
smaller one has been edited to remove redundant points from straight
tracks. This improves the speed of the download as well as performance once the file is loaded.
Sometimes MaxSea Track files are separated from the Mark (chart notations) files.
Download instructions are provided if you need them.
These files are provided free and we are actively soliciting cruisers to send us your track
files so we can post them for others to download. If you would like to to participate, please
email us your track files (as attachments to our HackingFamily
account, not our Winlink acct) along with your boat name and draft. If you include your
website and boat details, we'll link back to you from our
Cruising Links page.
Disclaimer: While we always try to provide useful information, we can take no responsibility
for its accuracy or usefulness. Prudent mariners will always navigate using all means at
their disposal, and will not rely solely on electronic navigation.
Australia Tracks
| Boat |
Draft |
Year |
Comments |
MaxSea |
OpenCPN |
| Ocelot |
4.6' (1.4m) |
2006 |
Brisbane to Darwin |
Tracks: 420 KB or
24 KB
Marks: 8 KB |
(all) 34 KB |
See
Ocelot's Australia Tracks in a larger map
We remember sailing along the Australia coast fondly - it was some of the best sailing we've ever
done. We sort of flew up the Queensland coast as we were feeling late to get to
Darwin in time for the 2006
Darwin-Indonesia Rally.
So we sailed 1,370 nautical miles from Brisbane to Seisia (on the west side
of the York Peninsula) in only 28 sailing days, for an average of just under
50nm/day. Luckily, once we got to the Percy Isles,
the SE trades started blowing with a vengeance, so it wasn't hard to clock up some
impressive daily runs, as we only did 2 overnight sails in all that distance.
The table below, with the more in-depth comments below that, lists all
32 anchorages we visited on our way from Brisbane to Darwin. The anchorage
links go to the in-depth comments below, and the photo links usually show the
anchorage or its approach if we have them. Recently we added Google Map satellite shots of
each anchorage, with our track in and out (our anchorage is usually pretty obvious from the track).
These are much better than mud maps! Depths are in feet, distances
are in nautical miles, latitudes are all south, and longitudes are all
east. As always, if you have questions or comments, please
contact us - we'd love to hear from you!
Date
2006 |
Anchorage |
Depth |
Dist
nm |
South
Latitude |
East
Longitude |
Comments |
Photo |
| 15 May |
Tangalooma Wrecks |
20' sand |
28 |
27º09.7 |
153º22.1 |
Interesting but a bit of surge |
Photo |
| 16 May |
Mooloolaba |
10' mud |
35 |
26º40.6 |
153º08.4 |
Protected but can be crowded |
Photo |
| 24 May |
Double Island Pt. |
15' poor |
57 |
25º56.5 |
153º10.1 |
Rock in entrance from south |
Photo |
| 25 May |
Gary's Anchorage |
13' mud |
26 |
25º37.8 |
152º58.4 |
Inside Fraser Island |
Photo |
| 27 May |
South White Cliffs |
30' |
10 |
25º31.5 |
152º58.2 |
Creep up shallow channel |
Photo |
| 28 May |
Moon Point |
15' sand |
23 |
25º10.6 |
153º01.6 |
Beautiful long beach |
Photo |
| 30 May |
Great Keppel Island |
10' sand |
150 |
23º09.7 |
150º57.3 |
Very pretty |
Photo |
| 1 June |
Port Clinton |
25' sand |
44 |
22º32.9 |
150º45.5 |
Under Mt. Flinders |
Photo |
| 2 June |
Island Head Creek |
15' mud |
20 |
22º21.6 |
150º38.6 |
Several anchorages shoal quickly |
Photo |
| 3 June |
NE Percy Island |
35' |
51 |
21º39.2 |
150º20.1 |
Delightful anchorage |
Photo |
| 4 June |
Scawfell Island |
30' |
66 |
20º51.8 |
149º35.6 |
Very pretty |
Photo |
| 5 June |
Thomas Island |
27' |
35 |
20º32.5 |
149º06.5 |
Great sailing winds |
Photo |
| 6 June |
Airlie Beach |
mooring |
30 |
20º15.5 |
148.42.4 |
Pick up friend's mooring |
Photo |
| 10 June |
Townsville |
15' mud |
130 |
19º14.6 |
146º49.6 |
Marinas also available |
Photo |
| 12 June |
Hinchinbrook Island |
20' |
72 |
18º14.0 |
146º15.0 |
Shepherd Bay on north side |
Photo |
| 13 June |
Mourilyan Harbor |
25' mud |
41 |
17º36.4 |
146º07.5 |
Up Moresby River |
Photo |
| 14 June |
Cairns |
27' mud |
58 |
16º55.2 |
145º47.1 |
Tidal, crowded, not too secure |
Photo |
| 15 June |
Low Isles |
mooring |
37 |
16º22.9 |
145º33.8 |
3 public moorings available |
Photo |
| 16 June |
Hope Islands |
mooring |
40 |
15º43.7 |
145º27.4 |
2 public moorings available |
Photo |
| 17 June |
Lizard Island |
8' sand |
67 |
14º39.8 |
145º27.1 |
Very nice |
Photo |
| 22 June |
Flinders Island |
25' |
83 |
14º10.6 |
144º13.8 |
Fast sail, caught 2 fish, fed fleet |
Photo |
| 23 June |
Morris Island |
20' sand |
57 |
13º29.5 |
143º43.3 |
Watch for reefs, ships |
Photo |
| 24 June |
Cape Weymouth |
18' |
61 |
12º35.6 |
143º25.4 |
"I have no memory of this place" |
Photo |
| 25 June |
Margaret Bay |
10' sand |
42 |
11º57.6 |
143º12.4 |
Lobster fishermen! |
Photo |
| 27 June |
Escape River |
15' mud |
71 |
10º58.0 |
142º40.9 |
Lots of pearl farms, 13' min @ LW |
Photo |
| 28 June |
Seisia |
25' sand |
36 |
10º50.9 |
142º21.9 |
Delightful outpost, shops |
Photo |
| 3 July |
Marchinbar, Wessels |
20' sand |
339 |
11º04.5 |
136º43.8 |
Beautiful, deserted |
Photo |
| 7 July |
Malay Bay |
15' sand |
233 |
11º21.8 |
132º52.9 |
Protected |
Photo |
| 8 July |
Port Essington |
30' |
57 |
11º08.8 |
132º08.8 |
Rolly, Nice ranger station |
Photo |
| 9 July |
Berkeley Bay |
20' |
7 |
11º14.0 |
132º11.4 |
Better protected |
Photo |
| 10 July |
Alcaro Bay, Cape Don |
20' |
36 |
11º17.5 |
131º47.9 |
Great river to explore |
Photo |
| 11 July |
Fannie Bay, Darwin |
22' |
97 |
12º25.7 |
130º49.4 |
Huge tides, marinas, fuel, supplies |
Photo |

See a larger map of
Tangalooma Wrecks |

Tangalooma Wrecks anchorage, looking south |
The Tangalooma Wrecks (we love
these Australian names!) are a series of rusting old ships that were towed to
this popular Moreton Island anchorage and scuttled to make a breakwater.
The breakwater is only moderately effective, but the wrecks yield an eerie
ambiance to the anchorage, as well as providing habitat for fish and snorkeling
opportunities. We had a bit of difficulty finding a good anchoring depth
as we wanted to go right up to the northern end where it gets a bit narrow, but
the sand provides good holding. There's plenty of water to enter and exit
to the north, but our track of the easier southern entrance has, unfortunately,
been lost. |

See a larger map of
Mooloolaba |

Our Mooloolaba anchorage had a $1,000,000 view |
Our sail to Mooloolaba was a bit accidental
as we hadn't planned to go there but we'd blown out the clew of our spinnaker
and needed to get it repaired. The entrance is pretty straight forward
using the good leading lines. The pilings, for those so inclined, are just
inside the entrance on the right, as is a big marina (other marinas are
sprinkled around). We do not recommend contacting the Coast
Guard prior to entrance, as they sometimes make it sound like you have
to go to a marina, which can be quite expensive. The anchorage is past the
Coast Guard station, on the far side of a small island. It's shallow and
can be crowded with local boats, but there's lots of room.
We can recommend sailmakers Colin & Debbie Quin (phone [07]5450 6889 or
mobile 041 883 2615). They quickly collected, repaired, and
delivered our spinnaker for us and then charged us $50 less
than their quote! But Sunshine Liferaft tried to charge us almost
twice as much as their quote to service our liferaft, so I'd stay
away from Sunshine. |

See a larger map of
Double Island Point |

Our Double Island Point anchorage |
We tried to sail to Double Island Point but the
wind died on us so we ended up motorsailing much of the way. We're told an
anchorage can be made behind Noosa Head, but we wanted to get further as we were
feeling behind on our schedule to get to Darwin for the Rally. The
anchorage behind Double Island Point is well protected from all winds with some
south in them, but you need to watch out for the (usually visible) rock 1.1nm
off the point. We had no problems sailing inside this rock, passing just
outside the shallows about 0.6nm off the point. |

See a larger map of the
Wide Bay Bar |

Breaking swells to the side of Wide Bay entrance |
The wind had died and we didn't want to motor all the way
around Fraser Island, so we decided to take the more visually interesting
passage inside Fraser Island, through Wide Bay Harbour and up the Great Sandy
Strait. The Wide Bay Bar at the entrance should only be attempted during
settled weather and, ideally, about the middle of a rising tide. We never
saw less than 10' (3m) but the swells can get quite large and sometimes break.
Near Stewart Island, our old CM93 charts completely gave up but the newer charts seem to be fine.
Australia sells a pair of of excellent charts for this area. |

See a larger map of
Gary's Anchorage |

Approaching Gary's Anchorage |
Gary's Anchorage in a delightful wide spot off a side-stream that
offered nice opportunities for beach excursions, and we saw several animals
there, including Sea-Cows. We always moved at or near high water, usually
on a rising tide, and never saw less than 9' (2.6m). Some monohulls we
were traveling with nudged the mud-banks on the sides of the channels, but they
were going slowly and got off fairly easily. Leaving Gary's, we found we
could continue north to meet up with the main channel instead of back-tracking
to the main channel before heading north. Minimum depth we saw was 11'
(3.3m) at high water. |

See a larger map of
South White Cliffs |

Conspicuous wreck just north of S White Cliffs |
The trip north from Gary's anchorage goes over the
"top of the hill" near 25º33'S latitude. This is about where the tidal
currents change, but we saw no less than 12' (3.6m) at high water so most boats
should be able to get through if they watch the tides. 3.5nm past that
point we doubled back along the coast, past the conspicuous wreck, to the long
South White Cliffs anchorage. There's a campsite with an info-board
a bit north of the anchorage, but no drinking water. Like most Fraser
Island anchorages, there are walks along jeep-tracks into the interior of Fraser
Island, but it's a good idea to carry a stout stick with you in case you run
into dingoes. The sail north into Fraser Bay is generally in deeper water and not
so troublesome. |

See a larger map of our
Moon Point anchorage |

Our Moon Point anchorage off vast sand-flats |
We took the ferry pass to the inner channel, just off the
end of Moon Point, and never saw less than 12' (3.6m) at mid-tide.
The anchorage is not so much a point as a vast expanse of shallow sand - just go
past the ferry landing as far as you want and pick a spot. Then go ashore
to explore the extensive sandbanks and the millions of tiny sand crabs.
The charts show a fresh-water creek but it's only fresh-ish at low tide.
There was a boat anchored up the creek when we were there (must have gone up on
a very high tide) but it didn't look inviting. |

See a larger map of
Great Keppel Island |

Great Keppel Island anchorage |
From Moon Point we did one of our 2 overnight sails to
get to Great Keppel Island. This is a fairly straight shot so easy
to sail. We seriously considered visiting Lady Musgrave Island, as it's
reputed to be delightful (although it needs settled conditions) with excellent
snorkeling, but again we were feeling pinched by the calendar. We actually
anchored to the left (ahead) of the other boats in a little sandy bay as we
found the rest of the anchorage a bit deep. |

See a larger map of
Port Clinton anchorage |

Leaving Port Clinton (Split Island?) |
Approaching Port Clinton is actually easier
than it looks. There's plenty of water north of Round Island, and the
shallow bit just past there had 12' (3.3m) over it at low water.
There are several anchorages inside the sprawling
bay that's Port Clinton but you need to watch out for shallows. We
anchored on a sandy stretch just under Mt. Flinders. This sandy bit is
large enough for several boats and provided good holding and excellent
protection from any winds with any east in them. We're told there's
another good anchorage about 1/2nm further south (and the chart shows several
more possibilities) but we didn't investigate (or even take any pictures, it seems). |

See a larger map of
Island Head Creek |

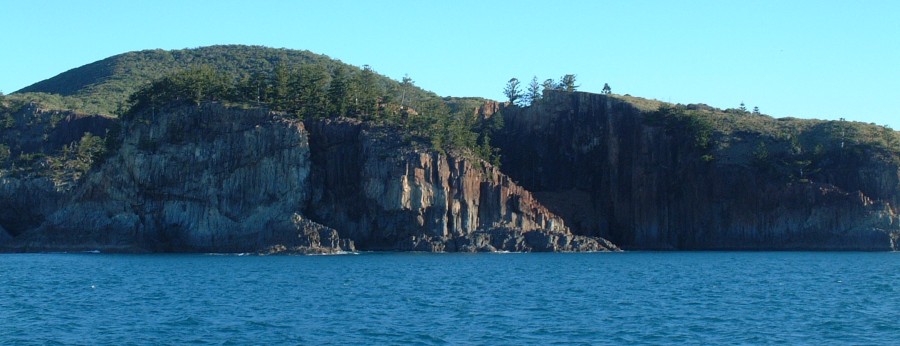
Rocky cliffs outside Island Head Creek |
Island Head Creek is only 11nm NNW of Port
Clinton. We went outside tiny Delcomyn but inside Dome and Split Islands
without any problems. The entrance was straight-forward and we found
plenty of water, even over the shallow section shown just inside the entrance.
But nosing about we found several areas that shoaled very rapidly, so be careful
and watch your depth-sounder. |

See a larger map of
NE Percy Island |

Blunt Bay anchorage, NE Percy Island |
Both S Percy and NE Percy Island have good
anchorages with protection from the predominant southerly winds.
We made good time coming up from Island Head Creek so chose to go all
the way to NE Percy. Some of our documentation disagreed on the exact
location of Graf Rock but it was easy to avoid all possibilities. The
anchorage is a bit deep (we anchored in 35' or 11m) but surprisingly protected
given that most of what was in front of us was just rocks. |

See a larger map of our
Scawfell anchorage |

Our delightful Scawfell Island anchorage |
We had a wonderful spinnaker run from Percy Island up
to Scawfell Island and were surprised to find good friends on Leprechaun
anchored there already. We chose to anchor in the first little bay on the
SW side of Refuge Bay. The normal anchorage is much larger (and probably
better protected if it's blowing hard) on the SE side of the bay, but 2-3 boats
can find seclusion away from the hoards in this little SW bay. Both
anchorages can be tricky as the coral comes out a fair way from shore, and we
found ourselves re-anchoring once or twice so we could lie happily with our
chain in sand. Scawfell Island was delightful, with good snorkeling, a
lovely white-sand beach, and lots of boulders to explore on the right hand side. |

See a larger map of
Thomas Island anchorage |

Approaching the Thomas Island anchorage |
From Scawfell Island north, the SE trades started to
really kick in, so we put the spinnaker away and opted instead for running
wing-and-wing. Thomas Island provides OK protection for a few boats
in these conditions, but it's much smaller than the more popular Shaw Island,
5nm further NW. We chose it because of that isolation, so we could
avoid the hoards of bareboats that infest the Whitsunday Islands (which we had
cruised in 2000 and decided not to repeat). Note when leaving that Long
Rock is actually somewhat south of its charted position. |

See a larger map of the
Airlie Beach area |

Our foaming wake as we screamed into Airlie Beach |
Good friends of ours own
Queensland Yacht
Charters in Airlie Beach, so we were able to pick up one of their
moorings. The anchorage off the marina is shallow mud and protected from
winds with any south in them, but it's actually rather crowded, with most boats
on moorings. There's a more protected anchorage to the east in Muddy Bay,
but it's harder to get ashore from there. Most cruisers seem to go to the
big marina, despite its fees and tricky entrance. Most facilities are
available, including a small chandlery, but the nice big new shopping center is a
bus or taxi ride away. We had access to a car so we could fill our jugs at
a normal filling station, but there's a (more expensive) fuel dock in the marina. |

See a larger map of the
Townsville anchorage |

Townsville anchorage - the beach is to the right |
From Airlie Beach we did another overnight passage
to get to Townsville. This bypassed several protected anchorages (Edgecumbe
Bay, Abbot Bay, Upstart Bay, Bowling Green Bay, etc.) but none of these are on
islands and we wanted to get to our friends
in Townsville for the weekend. Townsville has several marinas but we
anchored in the shallow mud behind the breakwater, just off the dredged
Breakwater Marina Channel. Townsville is less touristy than Airlie Beach,
but all facilities are available. We exited Townsville by sailing inside
Magnetic Island and Bay Rock, and found the charts accurate with plenty of water. |

See a larger map of
Hinchinbrook anchorage |

Our Shepherd Bay anchorage on N Hinchinbrook Is. |
Coming from Townsville, we sailed NW through the Palm
Isles, between Eclipse Island and Falcon/Brisk Islands, next to the old Steamer
Passage. Again, the charts
were accurate and there's plenty of water. From there, the route to
Shepherd Bay at the north end of Hinchinbrook Island is straight-forward.
With the SE winds blowing so strongly, we anchored in the far western
corner off a small beach to get the most protection. We might
well have gone out to the Great Barrier Reef
as we sailed between Townsville and Cairns, but the weather was uncooperative,
with strong south-easterlies and occasional wet rain-squalls - not the sort of
weather one wants at a poorly protected reefy anchorage. So instead we
stayed close to the coast, looking for protection more than scenery. |

See a larger map of
Mourilyan Harbor |

Approaching Mourilyan Harbor. The sugar terminal
is on the right, the anchorage is around to the left. |
Mourilyan Harbor
is only 41 miles north of Shepherd Bay, but the day was wet and the next
protected bay, Glady's Inlet, looked too shallow for us. Mourilyan Harbor
is a sugar shipping terminal so it takes big ships, which use much of the
available space for a turning area. The terminal suffered some damage in
Cyclone Larry that clobbered the area in March 2006 but the leading lines were
still fine, so getting into and out of the bay is straight-forward.
There are some pilings on the south side of the bay, but after
poking around for a while we decided to go past the pilings and anchor in the
river. The river shoals quickly beyond that. The sides of the turning basin
shoal too quickly to anchor on the fringes. |

See a larger map of the
Cairns Anchorage |

Cairns approach - anchorage left, marinas right |
Our trip to Cairns was again very fast, as the SE
winds were blowing hard. Entering the river is straight-forward but most
boats have to use the dredged channel, entering it at an appropriate point
considering depth and the state of the tide. CM93 charts appeared to be
spot-on accurate. We anchored on the east side of the river slough,
opposite the marinas. Given the crowding and the tidal currents, this was
not a good long-term anchorage, and we sat anchor-watch as the tide changed to
make sure we didn't touch any of our neighbors. The charts show more
marinas, pilings, and anchorage locations further up-river, but we didn't
investigate. Cairns is the last place to stock-up before Darwin,
which, at 1,250 miles away, took us a month to get to
(although some expensive supplies can be bought in Seisia). |

See a larger map of
Low Isles anchorage |

Low Isles anchorage - Ocelot is 2nd from the left |
Low Isles is a group of 3 isle-lets surrounded by
coral reef. The shipping lanes separate them from the Great Barrier Reef,
8 miles to the east. The parks department has put in 3 public moorings that are
available free on a first come, first served basis. These proved
surprisingly comfortable and protected, given that only coral was in front of
us. However, friends of ours anchored ahead and to the right of the
moorings, and reported that they were both secure and comfortable. The
western-most island has a nice big lighthouse and some historical buildings.
There was a very friendly lighthouse- and grounds-keeper who was happy to show
us around. |

See a larger map of
Hope Island anchorage |

Jon and Ocelot at Hope Islands |
Getting to the Hope Islands involves crossing the
busy shipping channels, as the 2 islands are actually in the middle of a split
in the shipping channels. Remember that inside those shipping channels,
yachts have essentially no rights - it's our responsibility to stay out of the
way. The anchorage is off the smaller north-eastern island, and again the
parks service has provided 2 free moorings, although the southern mooring
provides essentially no protection from the SE trades. The nominal
anchorage is between the 2 moorings. Getting to the anchorage from the
south is a bit dodgy as you must first sail between the 2 (reef surrounded)
islands, go at least ½ mile past the anchorage to avoid a sunken rock,
and then double back and approach the anchorage from the NW, ideally with a
spotter on the bows or even in the rigging. Walking around the island is
fun and there are lots of birds, but remember that this is crocodile country.
Strangely, official signs on the island allowed fishing and snorkeling, but
warned visitors not to go near the water because of the crocodiles... (Ya
gotta love Aussies!) |

See a larger map of
Lizard Island |

Lizard Island anchorage - Ocelot's at the top |
We had another flaming fast sail up to Lizard Island,
dodging between the shipping lanes and the Great Barrier Reef. Lizard is
one of those magic places where you want to stay for a long time - lovely
snorkeling over good coral, beautiful white sand beaches, hills to climb and
explore, there's even a supply of water for those who need. The resort has
an airport and, while they don't encourage yachts, you can get internet access
there. At the north end of the beach is a campsite that the yachts used to
meet at in the afternoon for sun-downers. There's a treasure chest there
from "HMS Pandora" as well as a guest book. That's also where the trail
starts to go up to the top of Cook's Look, which offers spectacular views of the
reef enclosed bay on the far side. Getting into Lizard Island presents no
problems if you stay to the left to avoid the big coral patch (shown in the
photo as darker areas). Ocelot's the topmost boat in the photo, and we
dropped the hook in 8' (2m) of pristine sand, but the rest of the anchorage is
deeper. There was a mooring behind us, but it was obviously for smaller
boats, as it was much too close to the reef for us to use. |

See a larger map of our
Flinders anchorage |

Anchorage off the east end of Flinders Island |
Flinders Island is 83 miles NW of Lizard
Island, but the SE winds blow so strongly through here that we sailed it easily in
daylight hours, leaving at 6:15, surfing at times to over 13 knots, and
arriving just after 5pm. The route follows the shipping channel so yachts
need to keep a good lookout for reefs to the right, and ships front and back.
AIS would be useful here as visibility can be
very poor in squalls.
Particular care must be taken when rounding Cape Melville, as the winds really
accelerate there. We sailed inside Boulder Rock and had ample water, but
we saw 40 knots of wind. Boats anchored in Bathurst Bay were trapped by 50 knot
winds that prevented them from picking up their anchor! There are several
anchorages at Flinders - we went to a nice sheltered shelf off the east end.
Since we'd caught 2 nice fish we also ended up feeding the fleet - 16 people
for dinner after sailing 83 miles! |

See a larger map of
Morris Island |

Ocelot (left) and Kindara off Morris Island |
We chose a minimum length path for the 57 miles to Morris Island,
crossing the shipping channels and then staying just inside the many reefs to the
right. The light/buoy shown on the charts at 13º57.5'S 143º48.9'E was not
seen when we went past in 2006 but it's hardly necessary. There was also a
sand spit that extended NW from Fife Island that wasn't charted, but otherwise
the CM93 charts seemed accurate. The reef around Morris Island is much larger
than the island. We anchored just NW of the island but there's a large
sand-bank to the NE that looked protected, especially at low tide. Walking
around the island is interesting, with birds nests in the sand, nesting Osprey
in the snags, and a lone gravesite. |

See a larger map of
Cape Weymouth |

Storm damaged lighthouse (WaterWitch Reef?) |
We again chose a fairly direct path for the
61 miles from Morris Island to Cape Weymouth. We skirted between
Drake Shoals and Blanchard Reef, then between Waterwitch Reef and Glennie Reef,
made a rather oblique crossing of the shipping lanes but kept well outside the
shallows off Cape Direction before passing between Restoration Rock and
Restoration Island and on to our anchorage at Portland Roads behind Cape
Weymouth. Unfortunately, the weather really socked in towards the end, to
the point that we almost hit a couple of southbound fishing boats (and didn't
take photos). The anchorage itself was blessedly protected but otherwise unremarkable. |

See a larger map of
Margaret Bay |

Margaret Bay lobster boat and anchorage |
Since our electronic charts were proving so accurate
and reliable, we chose a much straighter route to Margaret Bay than the
other 6 boats we'd been sailing with since Lizard Island, sailing outside Hazel,
Kay, Laurel and Moody Reefs before re-crossing the shipping lanes and going
between Gore Island and Hicks Island. We also found there was plenty of
water inside Bremner Shoal, just off the north side of Cape Grenville. The
anchorage at Margaret Bay is delightful, with a long beach to the right and
excellent holding on the gently shoaling sandy bottom. The local fishing
boats are well aware of the bay's protection, and we're told that private planes
sometimes land on the beach to take away the fish. The "Blue Trail" is an
interesting, mostly dry track to the windward side of Cape Grenville, marked by
mostly blue bits of flotsam that have blown onto the beach, but keep a lookout
for crocodiles. We were lucky in that a lobster-boat was in the anchorage
with us, and they were happy to sell us huge lobsters for A$5/kg (US$1.70/lb!) |

See a larger map of
Escape River |

Amanda and our Escape River anchorage |
From Margaret Bay it's a long 71 mile sail to Escape River,
but it cuts the sail to Seisia into 2 day-sails and makes it much easier to choose
the tide when transiting Albany Pass and going over the top of the York Peninsula. Most boats are put
off by the charts, which show the Escape River bar as having only 8' (2.5m) of
water, but we found that there was fully 13' (4m) of water even at low tide when
entering and leaving on an east/west line at about 10º57.2S. A more
important concern are the large and uncharted pearl-farms just inside the
entrance. Once past those, there are several good anchorages. We
chose one near the entrance as we wanted to leave early to catch the tide for
the Albany Pass. |

See a larger map of the
Seisia anchorage |

Approaching the Seisia anchorage |
The trip over the top of the York Peninsula to Seisia
was the culmination of over 1,300 nautical miles of enjoyable but hard sailing.
But you want to transit Albany Pass (SE to NW) on a rising tide to
have favorable currents, which can run at several knots. Also, the waters
west of the York Peninsula can be shallow, so a high tide will help. We
found several un-charted pearl-farms in the shallows, so keep a good lookout.
Use the charted ranges when approaching Sesia to stay in deeper water. The
anchorage is in good sand just past the jetty, but leave room for the small
freighters to enter and leave. Seisia has a fuel station not far from the
jetty and a nice grocery store south of the anchorage but close to the beach.
Water is available in the park, and showers, washing machines, and drying lines
can be had at the campground. A good place to relax and catch your breath
before the next leg to Darwin. |

See a larger map of
Two Island Bay |

Approaching the anchorage at Two Island Bay
Vagabond Heart is just visible in the upper left. |
The Gulf of Carpentaria is very shallow and can turn
into a real washing machine in strong winds, making for a very uncomfortable
sail. Boats that went ahead of us generally had a rougher time of it, but we had
a delightful 2 night passage. After clearing the shallow banks to the west
of Endeavour Strait we headed for Marchinbar Island, the northernmost of the Wessel
Islands. Some boats went to Gove, but this put them harder on the wind,
with lots of strong currents and narrow channels to negotiate afterwards.
We gave Cape Wessel a good offing and then found a delightful anchorage in the
northern half of Two Island Bay. We had fun exploring the rocks and found
what appeared to be petrified sea-bed, with the sand-ripples still visible. |

See a larger map of our
Malay Bay anchorage |

Exploring the Malay Bay beach with Calypso JJ |
We chose to head from the Wessels to Malay Bay,
just past Cape Cockburn on the mainland. This is not a common stop and
there's nothing much there, but it was only a single overnight and allowed us to
day-sail the rest of the way to Darwin. There was still a fair amount of
wind (the GPS says that Ocelot exceeded 13 knots on both this leg and the leg
from Seisia to the Wessels) but the seas were relatively flat, making for a pleasant
passage. Entering Malay Bay is straight-forward as long as you give the
rock north of Cape Cockburn a good offing. Then just go as far as you want
into the bay and anchor wherever seems appropriate. Most likely you'll
have the whole place to yourself. |

See a larger map of our
Black Point anchorage |

Swell sometimes enters the Black Point anchorage |
The 57 mile sail from Malay Bay to Port Essington
involves going up Bowen Strait, inside Crocker Island. We found the 2005-series
CM93 electronic charts to be both lacking in detail and inaccurate for this leg.
We found the best deep water to be along the eastern (rightmost) edge of what's marked
as deep water on the charts. Any further west (into what's marked as
deeper water) resulted in shallower water. This is born out if you expand the Google map - the
deeper water is to the right (east) of our track. We also found that the shallows
off Smith Point extended somewhat further out than charted. The anchorage
off Black Point was straight-forward, but a swell tended to creep around the
point in the SE winds we were experiencing. Ashore is a nice ranger
station with interesting exhibits and some walking trails for the hardy. |

See a larger map of our
Berkeley Bay anchorage |

Berkeley Bay anchorage and Caiman Creek |
Although Black Point was nice, the swell got bothersome,
so we moved 6 miles SSE to Berkeley Bay, which was much more
protected. We anchored in the middle of the bay in 20' (6m) of good
holding sand. There's no ranger station (or anything else) ashore but we
had fun exploring the long beach and walking up Caiman Creek. Although we
saw no crocodiles, we saw lots of tracks in the sand, many of them fairly fresh. |

See a larger map of our
Alcaro Bay anchorage |

Amanda at our Alcaro Bay, Cape Don anchorage |
The last (westernmost) bay on the Cobourg Peninsula is
Alcaro Bay near Cape Don. Christies Bay didn't look big enough for
us, and it's much harder to leave at night. Getting to Alcaro Bay is
relatively easy if one gives the shallows off Vashon Head a wide berth, but the
currents in Dundas Strait, east of the Cobourg Peninsula, can run quite
quickly and must be taken into account. Alcaro Bay itself is an easy,
gently shoaling anchorage. The interesting part is the creek that feeds
into the southern end of the bay. There were a set of 4 buoys to guide the
fishing boats parallel to the beach through the shallows.
Then it opens up into one of the nicest mangrove rivers we've seen since Fiji.
We planed up the river for perhaps 20 minutes in the dinghy. On the way
out we talked to the fishermen who told us about the rivers 3 resident
crocodiles, including one with only 3 legs. Sounds like a bad neighborhood
for swimming... |

Approaching the Fannie Bay anchorage, Darwin |
We put together a fairly elaborate spreadsheet to work
out the best leaving time to catch the tidal currents through Van Diemen Gulf
and Clarence Strait. It worked out that 2am was the optimal time so we
didn't get much sleep but we fairly shot down Dundas Strait with a 5 knot
current assist. We went outside (SE) of Ommaney and Renard Shoals, then NW
of both Beagle Shoals and NW Vernon Island. Then we turned SSW until we
cleared the shallows and could head straight into Fannie Bay, Darwin.
Care must be taken when anchoring to account for the tides, which can run
25' or 8m! This meant that even catamarans had to anchor fairly
far out or risk grounding at low tide. But it also means that it's easy to
careen on the beach to quickly scrub the bottom, and several stands are around
for that. There's another anchorage south of Darwin in Francis Bay if the
winds are blowing from the north, and there are several marinas, some of which
have locks to control the tidal change. But before entering the locks the
officials will probably pour some chemicals in your toilet and make you wait
18 hours while it kills any bugs it finds.
There's a fuel dock behind the breakwater next to the entrance to Cullen Bay
Marina, but some of the operators are stingy with the water, which has to come
from the fire-hose (Fannie Bay is too muddy to use a watermaker). They
also wouldn't let me use my Baja Filter for the diesel. The yacht chandlery
at Cullen Bay can get cooking gas bottles filled. Busses run fairly often
from the sailing club to downtown Darwin and back. In 2006 we could buy a
pass for a few dollars, but the equipment on the busses couldn't deduct the fare
from the passes, so they lasted forever. There are big Woolies and Coles
grocery stores downtown, and even bigger ones in huge shopping malls out of
town. There are many yacht supply shops and you should get what you need
now, because we haven't really seen a good yacht shop since we left, almost a
year ago now. Note that first-world (Australian) bottom paint doesn't work
nearly as well as bottom paint bought in Langkawi, Malaysia.
The expensive Jotun bottom paint we put on in Darwin was useless just 6 months later.
Sue's put together a document on SE Asia
Provisioning, which includes recommendations on what to be sure to buy in
Australia before heading to Indonesia and farther north. Check it out!
Fair Winds and Calm Seas -- Jon, Sue and Amanda Hacking
Pacific Cruising Info:
Up | South Pacific Weather | South Pacific Schedule | Panama Transit | Cruising Galapagos | Cruising Marquesas | Tonga-Fiji Hazards | Cruising Fiji | Australian Arrival | Cruising Australia | Cruising Solomons | Cruising PNG | Cruising Philippines
Cruising Info:
General Cruising Info | Equipment | Pacific Ocean Cruising | Indian Ocean Cruising | Provisioning Food & Fuel | Cruising Recipes
Top Level:
Home |
Destinations |
Cruising Info |
Underwater |
Boat Guests |
Ocelot |
Sue |
Jon |
Amanda |
Chris |
Site Map |
Make a Comment
 |
Lifetime
Commodores
of the
Seven Seas
Cruising
Association |
 |
|
If our information is useful,
you can help by making a donation
|
Copyright © 2000‑ Contact:
Jon and Sue Hacking -- HackingFamily.com, svOcelot.com.
All rights reserved.


